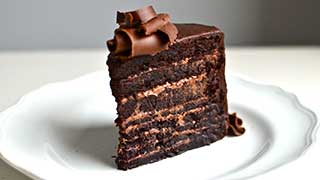

There’s a reason this moist chocolate cake recipe is the one I keep coming back to after fifteen years of baking birthday cakes, potluck desserts, and late-night “I need chocolate right now” emergencies.
It’s the kind of cake that stays tender for days, has a deep, real chocolate flavor instead of a flat cocoa taste, and doesn’t require any fancy equipment or hard-to-find ingredients.
I’ve tested this recipe more times than I can count, tweaking the ratio of buttermilk to oil and figuring out exactly why hot coffee makes such a dramatic difference in the crumb.
What I landed on is a one-bowl, no-mixer-required cake that bakes up soft, dense-but-not-heavy, and genuinely moist without being greasy.
If you’ve ever pulled a chocolate cake out of the oven only to find it dry, crumbly, or bland, this recipe fixes all three problems at once. Let’s get into it.

Table of Contents
Why You’ll Love the Moist Chocolate Cake Recipe
- Incredibly moist crumb that holds up for days, not just the first slice
- Deep, rich chocolate flavor thanks to a hot coffee and cocoa combination
- One-bowl method with no stand mixer required
- Uses simple pantry staples you likely already have
- Bakes evenly with a tender texture, never dry or crumbly
- Works as a layer cake, sheet cake, or cupcakes with zero recipe changes
- Freezer-friendly, so you can bake ahead for any occasion
- Forgiving recipe that’s beginner-friendly but tastes bakery-level
Ingredients
For the Cake
- 2 cups (250g) all-purpose flour
- 2 cups (400g) granulated sugar
- ¾ cup (75g) unsweetened cocoa powder (natural or Dutch-process)
- 2 teaspoons baking soda
- 1 teaspoon baking powder
- 1 teaspoon fine sea salt
- 2 large eggs, room temperature
- 1 cup (240ml) buttermilk, room temperature
- ½ cup (120ml) vegetable oil or neutral oil
- 2 teaspoons pure vanilla extract
- 1 cup (240ml) hot coffee (or hot water)
For the Chocolate Frosting
- 1 cup (226g) unsalted butter, softened
- 1 ½ cups (150g) unsweetened cocoa powder
- 5 cups (600g) powdered sugar, sifted
- ½ cup (120ml) heavy cream or whole milk
- 2 teaspoons vanilla extract
- ¼ teaspoon fine sea salt
Ingredient Notes
Cocoa powder: Natural cocoa gives a slightly tangier, classic chocolate cake flavor, while Dutch-process cocoa creates a darker color and smoother taste. Either works well in this recipe, since the baking soda-baking powder combination balances both.
Buttermilk: This is key to the tender, moist crumb. If you don’t have buttermilk, stir 1 tablespoon of white vinegar or lemon juice into 1 cup of regular milk and let it sit for 5 minutes before using.
Oil instead of butter: Oil stays liquid at room temperature, which is exactly why this cake stays soft even after refrigeration. Butter-based chocolate cakes tend to firm up when chilled. You can substitute melted coconut oil in a pinch.
Hot coffee: Coffee doesn’t make the cake taste like coffee. It intensifies the chocolate flavor by blooming the cocoa powder. If you prefer to skip it, hot water works, though the chocolate flavor will be slightly milder.
Eggs: Room-temperature eggs incorporate more evenly into the batter, which helps the cake rise more consistently. Cold eggs can cause the batter to seize slightly.
Kitchen Equipment Needed
- Two 9-inch round cake pans (or one 9×13 sheet pan)
- Large mixing bowl
- Whisk and rubber spatula
- Measuring cups and spoons
- Parchment paper
- Wire cooling rack
- Offset spatula for frosting
Prep Time
20 minutes
Cook Time
30–35 minutes
Total Time
1 hour, plus cooling time
Servings
12 servings
Step-by-Step Instructions
- Preheat and prep your pans. Preheat your oven to 350°F (175°C). Grease two 9-inch round cake pans and line the bottoms with parchment paper. This prevents sticking and ensures a clean release, which is especially important since this batter is thin.
- Whisk the dry ingredients. In a large bowl, whisk together the flour, sugar, cocoa powder, baking soda, baking powder, and salt until well combined. Whisking (rather than sifting) is enough here since cocoa powder tends to clump, and a thorough whisk breaks it up.
- Add the wet ingredients. Add the eggs, buttermilk, oil, and vanilla extract directly into the dry ingredients. Whisk until just combined, with no streaks of flour remaining. The batter will be thick at this stage, which is normal.
- Stir in the hot coffee. Slowly pour in the hot coffee while whisking gently. The batter will become noticeably thin, almost like chocolate milk. This is exactly what you want. The hot liquid blooms the cocoa, deepening the chocolate flavor and helping create that signature moist texture.
- Divide and bake. Pour the batter evenly between the prepared pans. Bake for 30 to 35 minutes, or until a toothpick inserted into the center comes out with a few moist crumbs (not wet batter). Avoid opening the oven door before the 25-minute mark, since a temperature drop can cause the cake to sink in the middle.
- Cool completely. Let the cakes cool in the pans for 10 minutes, then turn them out onto a wire rack to cool completely, at least 1 hour. Frosting a warm cake will cause the frosting to melt and slide, so patience here matters.
- Make the frosting. Beat the softened butter until smooth and creamy. Add the cocoa powder and mix until combined. Alternatively, add the powdered sugar and heavy cream in batches, beating well after each addition, until the frosting is smooth and spreadable. Stir in the vanilla and salt.
- Assemble the cake. Place one cooled cake layer on a serving plate or cake stand. Spread an even layer of frosting on top, then place the second layer on top. Frost the top and sides of the entire cake using an offset spatula, smoothing or swirling as desired.
- Slice and serve. Let the frosted cake sit for about 15 minutes before slicing so the frosting can set slightly. Use a sharp knife, wiping it clean between cuts for the cleanest slices.
Pro Tips
- Weigh your flour if possible. Scooping directly from the bag can pack in extra flour, leading to a denser, drier cake.
- Room temperature ingredients blend more evenly, which directly affects how consistently the cake rises.
- Don’t overmix once the flour is added. Overmixing develops gluten, which can make the cake tough instead of tender.
- Use an oven thermometer if your oven runs hot or cold, since chocolate cakes are sensitive to temperature swings.
- Let cakes cool completely before frosting, even if you’re in a hurry. This is the single most common reason frosting slides off.
Common Mistakes to Avoid
- Overbaking: Chocolate cake can look done before it actually is because the dark color hides slight underbaking, but it can also dry out fast if left in even a few minutes too long. Check at the 30-minute mark.
- Skipping the parchment paper: Cocoa-based batters are more prone to sticking than vanilla batters, so don’t skip this step.
- Using cold buttermilk or eggs: This can cause the batter to look slightly curdled and bake unevenly.
- Opening the oven too early: This causes a temperature drop that can make the center sink.
- Frosting a warm cake: This is the top reason frosting looks messy or melts off the sides.
Variations
- Chocolate Espresso Cake: Add 1 tablespoon of instant espresso powder to the dry ingredients for a mocha-forward flavor.
- Chocolate Peanut Butter Cake: Swap the frosting for a peanut butter buttercream and add a peanut butter drizzle on top.
- Chocolate Raspberry Cake: Spread a thin layer of raspberry jam between the cake layers before frosting.
- Gluten-Free Chocolate Cake: Substitute a 1:1 gluten-free flour blend for the all-purpose flour.
- Chocolate Sheet Cake: Bake the batter in a 9×13-inch pan for 35 to 40 minutes for an easy, no-layering dessert.
- Chocolate Cupcakes: Divide the batter into a lined cupcake pan and bake at 350°F for 18 to 20 minutes for about 24 cupcakes.
- Dark Chocolate Cake: Use Dutch-process cocoa powder and add ½ cup of melted dark chocolate to the batter for a richer, more intense flavor.
Storage Instructions
Store the frosted cake in an airtight container at room temperature for up to 3 days, or in the refrigerator for up to 5 days. If refrigerated, let slices sit at room temperature for about 20 minutes before serving so the crumb softens back up.
Freezing Instructions
Unfrosted cake layers freeze beautifully. Wrap each cooled layer tightly in plastic wrap, then in aluminum foil, and freeze for up to 3 months. Thaw at room temperature for a few hours before frosting. Frosted cake can also be frozen; slice first, then freeze slices individually wrapped for easy single-serving thawing.
Reheating Instructions
This cake is best enjoyed at room temperature and doesn’t require reheating. If you prefer a warm slice, microwave a single piece for 10 to 15 seconds to soften the frosting slightly without melting it completely.
Make Ahead Tips
Bake the cake layers up to 2 days in advance and store them, tightly wrapped, at room temperature, or freeze them as noted above. The frosting can also be made up to 3 days ahead and stored in the refrigerator; let it come to room temperature and re-whip briefly before using.
What to Serve With This Recipe
- A scoop of vanilla bean ice cream
- Fresh raspberries or strawberries
- A hot cup of coffee or espresso
- A glass of cold milk
- Lightly sweetened whipped cream
Troubleshooting Section
My cake sank in the middle. This usually happens from underbaking, opening the oven door too early, or using too much leavening agent. Double-check your baking soda and baking powder measurements and let the cake bake undisturbed for at least 25 minutes before checking.
My cake is dry. This is almost always a sign of overbaking or too much flour. Start checking for doneness at the 30-minute mark and measure flour by weight if possible.
My cake is dense and heavy instead of light. This can happen if the batter was overmixed after adding the flour, or if the baking soda and baking powder were expired. Fresh leavening agents matter more than people expect.
My frosting is too thin. Add more sifted powdered sugar, a couple of tablespoons at a time, until it reaches a spreadable consistency.
My frosting is too thick. Add heavy cream or milk, one teaspoon at a time, until smooth.
Expert Tips
Professional bakers often rely on the “reverse creaming” method for extra-tender cakes. Still, for a moist chocolate cake specifically, the oil-and-buttermilk combination used here does more for texture than any mixing technique. Oil coats the proteins in the flour more thoroughly than butter does, which limits gluten development and keeps the crumb soft even days after baking. This is also why oil-based chocolate cakes tend to stay moist longer than butter-based ones.
Nutritional Information
Note: Values are approximate and will vary based on specific ingredients and brands used.
| Nutrient | Amount (per slice) |
| Calories | 480 kcal |
| Total Fat | 20g |
| Saturated Fat | 9g |
| Cholesterol | 55mg |
| Sodium | 320mg |
| Total Carbohydrates | 72g |
| Dietary Fiber | 3g |
| Sugars | 55g |
| Protein | 5g |
External Reference Suggestions
For readers who want to dig deeper into the science and technique behind baking, these authoritative sources are worth exploring:
- King Arthur Baking Company for baking science, ingredient guides, and troubleshooting resources
- Serious Eats for in-depth explanations of baking techniques and ingredient functions
- USDA FoodData Central for detailed nutritional data on baking ingredients
Recipe Summary
This moist chocolate cake recipe delivers everything a great chocolate cake should: a tender, rich crumb, deep chocolate flavor, and a simple one-bowl method that requires no special equipment. Whether you bake it as a layer cake, sheet cake, or cupcakes, the technique stays the same, and the results are consistently moist and flavorful.
If you try this moist chocolate cake recipe, I’d love to hear how it turns out. Leave a comment below with your results, snap a photo and tag it if you share it online, and let me know which variation you tried. Happy baking.