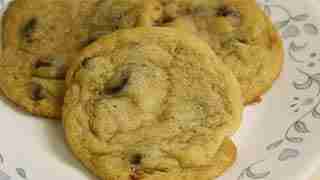
Craving something sweet but short on time? These Easy Chocolate Chip Bars are your new go-to for busy weekdays, bake sales, or late-night chocolate emergencies. Think soft, buttery cookie meets gooey chocolate in every bite—like a warm hug in dessert form!

I whipped these up once while multitasking laundry and a toddler meltdown—I still nailed it in under 30 minutes: no fancy steps, just pantry staples and pure comfort baked into a bar.
Recipe Information
Preparation time: 15 minutes
Cooking time: 25-30 minutes
Total time: 40-45 minutes
Serving: 16 generous bars (or 24 smaller ones if you have self-control!)
Ingredients You’ll Need
For the Bar Base:
- 1 cup (226g) unsalted butter, melted and slightly cooled
- 1 cup (213g) packed light brown sugar (the molasses adds amazing flavor!)
- ½ cup (99g) granulated sugar
- 2 large eggs, room temperature
- 2 teaspoons vanilla extract
- 2¼ cups (281g) all-purpose flour
- 1 teaspoon baking soda
- 1 teaspoon salt (don’t skip this – it makes the chocolate pop!)
- 2 cups (340g) chocolate chips (semi-sweet or milk chocolate work great)
Optional Add-ins:
- ½ cup (57g) chopped walnuts or pecans
- ¼ cup mini chocolate chips for extra chocolate goodness
Tools and Equipment
You probably have everything already:
- 9×13 inch baking pan (metal works best for even browning)
- Large mixing bowl
- Whisk or electric mixer
- Rubber spatula
- Measuring cups and spoons
- Parchment paper (your new best friend for easy cleanup!)
Preparation: Getting Ready to Make

Set yourself up for success! Here’s how to prep like a pro:
- Preheat your oven to 375°F (190°C) – this temperature gives you perfectly chewy bars with slightly crispy edges
- Line your 9×13 pan with parchment paper, leaving some overhang for easy removal
- Melt your butter and let it cool for 5 minutes (hot butter can scramble your eggs!)
- Bring eggs to room temperature by placing them in warm water for 10 minutes
Pro tip: Mix room temperature ingredients better to create a more tender texture!
Step-by-Step Instructions
Step 1: Mix the Wet Ingredients
Combine the melted butter and both sugars in a large bowl. Whisk until smooth, about 1 minute. When you’re done, the mixture should look like wet sand.
Add eggs one at a time, mixing well after each addition. Then stir in that vanilla extract. Your kitchen should smell amazing right about now!
Step 2: Add the Dry Ingredients
The flour, baking soda, and salt are added. Mix just until combined—don’t overmix! Overmixing develops the gluten, making your bars tough instead of tender.
The science bit: Baking soda creates lift and helps with browning, while salt enhances all the flavors and balances the sweetness.
Step 3: Fold in the Good Stuff
Gently fold in the chocolate chips (and nuts, if using). Use a rubber spatula to fold just until evenly distributed. Save a handful of chips to sprinkle on top for that bakery look!
Step 4: Bake to Perfection
Spread the dough evenly in your prepared pan. Don’t worry about making it perfectly smooth – rustic is charming!
Sprinkle those reserved chocolate chips and bake for 25-30 minutes. The edges should be golden brown and set.
How to Know When It’s Done?
Look for these signs:
- Edges are golden brown and pulling slightly from the sides
- Center is set but still somewhat soft (it’ll continue cooking from residual heat)
- A toothpick inserted in the center comes out with a few moist crumbs, not wet batter, but not completely clean either
The key: Slightly underbaked is better than overbaked! They’ll firm up as they cool.
Tips for the Perfect Chocolate Chip Bars
- Choose your chocolate wisely: Semi-sweet chips hold their shape best, but milk chocolate melts beautifully for gooey pockets of sweetness.
- Please don’t skip the cooling time: Let them cool completely in the pan (about 2 hours) before cutting. Patience pays off with clean, neat squares!
- Line with parchment: This isn’t just for easy removal – it prevents sticking and makes cleanup a breeze.
- Room temperature ingredients mix better: Cold eggs and butter create a lumpy batter that bakes unevenly.
Common Mistakes to Avoid
- Overmixing the batter: This develops gluten, making your bars tough and chewy instead of tender.
- Overbaking: They’ll continue cooking in the hot pan, so pull them out when the center is set.
- Cutting too soon: Hot bars crumble and fall apart. Cool completely for neat, clean cuts.
- Using the wrong pan size: A different size changes the thickness and baking time. Stick to 9×13 for best results!
Nutrition Facts
Per bar (based on 16 servings):
- Calories: 285
- Total Fat: 12g
- Saturated Fat: 7g
- Cholesterol: 45mg
- Sodium: 180mg
- Total Carbs: 44g
- Dietary Fiber: 2g
- Sugars: 28g
- Protein: 4g
Serving Suggestions
- These bars are delicious on their own, but here are some fun ways to jazz them up:
- Warm them slightly and serve with a scoop of vanilla ice cream for an instant sundae.
- Drizzle with caramel or chocolate sauce for extra indulgence.
- Pack them in lunch boxes – they travel beautifully and improve with age.
- Serve with cold milk for the ultimate nostalgic treat.
- Cut into smaller squares and arrange on a platter for parties – they disappear fast!
Storage tip: You can store them at room temperature for up to a week or freeze them for up to 3 months. (They’ve never lasted that long in our house!)
There you have it – your new favorite easy dessert! These chocolate chip bars prove that simple ingredients can create something magical. Whether you’re baking for a crowd or just treating yourself, these bars deliver every single time.
Happy baking!